Smartsheet Control Center
Smartsheet Control Center is loved by PMO leads, project managers and portfolio managers, and by anyone tasked with working on, managing, overseeing, or reviewing projects.
Smartsheet Control Center (SCC) is a solution that enables organisations, teams, and project managers to:
- Collate the required information for projects to be approved
- Track approvals
- Replicate agreed, consistent documentation for every project
- Follow and outline project plan, created for your ways of working
- Automatically generate reports and dashboards, tailored for every audience, in real-time
Smartsheet Control Center Essentials
This video demonstrates the SCC key elements in action:
Video Transcript: Hi this is Gary from Cheetah Transformation and this is a Smartsheet Premium App overview for Control Centre. Smartsheet Control Centre delivers project consistency and visibility at scale by automating project creation, aggregating portfolio reports and managing change. This is a schematic of Smartsheet Control Center. There are five pillars – initiation, creation, live projects, reporting and archiving, all underpinned by eight key elements. This short video will focus on elements 2. Intake Sheet , 3. Project Templates and Control Center and 6. Reporting. Once you’ve watched this video if you’d like more information on the other elements head to the longer Control Center video and the Global Update videos on the Cheetah Transformation YouTube channel.
Let’s start with no 3. Project Templates as this is the heart of the Smartsheet Control Center and have a look at what a template set can look like. For the purposes of demonstration let’s imagine that we are new product development managers at Coca-Cola. So this would be our template set for working through a new product development project with a project dashboard, four sheets and the associated reports the project needs. Starting with the project dashboard, this holds all the key information about the project but as a template of course this is empty. If we click through to the project plan you can see that it has been set up with standard project stages and steps every project needs to go through, but of course has no start, finish date or assigned to because that will all be added when the project goes live. The other sheets in the template set, the Weekly Update the RAID log and the Forecast are similarly created, they have been set as standard but with no information so that they are ready to be used for a project. This demo is using new product development as an example but of course a template set can be created for any type of project. Now we’ve had a look at the template set, let’s have a look at how we turn that template set into a project. This is the Intake Sheet, element 2 in our schematic. It holds information that has been stipulated as required to set up a new project. Information can be added via a form or it can be added directly into the sheet and dates, names, links or even attachments can also be added. Within an Intake Sheet you can use the automation options to add an approval workflow which means only projects that the business wants to proceed with will actually be set up. We’ve done that here and we’re capturing the output of that approval flow here, in the Project Approval column. Once a project has been approved it can now be created in Control Center. Once a project has been created the system will automatically tick this button and add a link into this column and that means a project can’t be set up twice. As you can see we’ve got several projects approved but not yet set up so let’s head over into Control Center and get one of those set up now. Start by selecting the blueprint or template set you want to use so in our case we’re going to use CT NPD, the one we looked at earlier and then we press next. We want to set up our project including all the sheets and reports that we looked at earlier. So again we will press next and this is where we get to choose which project we’re setting up. If we click this drop down it will show us the list of all the projects we saw that were already pre-approved in the intake sheet. so we can select one of those that will then populate this information. We then press next, we’ll be asked about sharing, if you wish to choose at this point who your project is shared to you can add them in here, otherwise just press create project. This will take a few minutes to do so we’ll go over and look at a project that was set up earlier. We set our Control Center to store all our live projects in one workspace together, let’s have a look at Cucumber and Vitamin E. Opening the project folder you can see that all the templates we saw earlier exist and the Control Center has prefixed each with the project name so it’s easy to keep track of what’s what. When you open the dashboard you’ll again recognise this dashboard from earlier but now it’s populated with all the information being generated within a live project. We’ve also got information here that we added to the Intake Sheet so we have the links, we have who’s in the team and we have the target launch date for example. Moving to the project plan. , in a similar way you can see that that now has populated with dates and with who tasks are assigned to and is tracking status of tasks as we go and feeding that information back onto the dashboard, where we can see overdue & current tasks. This is a great way to keep an overview for a single project but we also need to be thinking about visibility a portfolio level and this is where Smartsheet Control Center really excels. Each project that exists within our project workspace is sending information to the Blueprint Summary Sheet (element no 5) in real time and that means the Blueprint Summary Sheet becomes a repository of all live project information that can be used across the business. By using a range of dashboard different users can access different information that’s relevant to them again in real time. The most common dashboards we see are a Portfolio, with an overview of all projects, Team or Department dashboards that are just covering the projects relevant to that team or department and the My Dashboard which is an individual tailored view of the projects the individual is involved with. Here are some examples of those using our project workspace. This is the Executive or Portfolio dashboard for our imaginary soft drinks new product development projects. The top section covers the headlines across the portfolio: numbers of projects; their stage; their health as well as links to other key dashboards. Further down we give key information on each project organised by project stage. If any of the viewers of the dashboard want more information about any of the projects they can simply click on the project link and we’ll be taken to the project dashboard. This means that we’re getting all the key information and all the projects made visible without overloading anyone with details that they really don’t need. With that in mind we’ve created separate department or category dashboards for each of the four drinks types. These are very similar to the portfolio dashboard but only include projects that fall under that category. So you can see that here in the carbonate dashboard we only have five projects listed rather than the seven we have in total across the portfolio. Again this is about getting the most relevant information to the different audiences in the quickest and most easy way. Finally we have the My Dashboard, this is like a system generated to-do list. It’s gathering all the tasks assigned to me from across all the projects created through Control Center and this dashboard is dynamic it responds to the viewer. Everyone who looks at this dashboard will see a different view, they’ll only see their own tasks. When you use this dashboard as with all these dashboards including this Portfolio one, they’re updating themselves automatically in real time so there’s a real reduction in the time and effort spent on reporting and updating on projects. In this video we’ve looked at the blank Project Template set, we’ve looked at the Intake Sheet and using the information there to generate a live project. We’ve seen how once we have several live projects we can bring information together from them in the Blueprint Summary and generate different dashboards for different needs. That’s only a small part of what we can do with Control Center so if you’d like more information on the other elements, head over to the longer Control Center video and the Global Update videos on the Cheetah Transformation YouTube channel or check out our website where you can find blogs and further information and thank you for watching. Thanks for watching and for further details on our free and paid Smartsheet training courses please visit the training and events section on our website at www.cheetahtransformation.com alternatively, contact us directly on help@cheetahtransformation.com to arrange a call to discuss your requirements further.
Using Smartsheet Control Center allows your organisation to:
- Drive consistency across projects, portfolios & processes
- Improve visibility of progress and outcomes
- Improve project management efficiencies
- Automated project creation, managed changes & project info aggregation
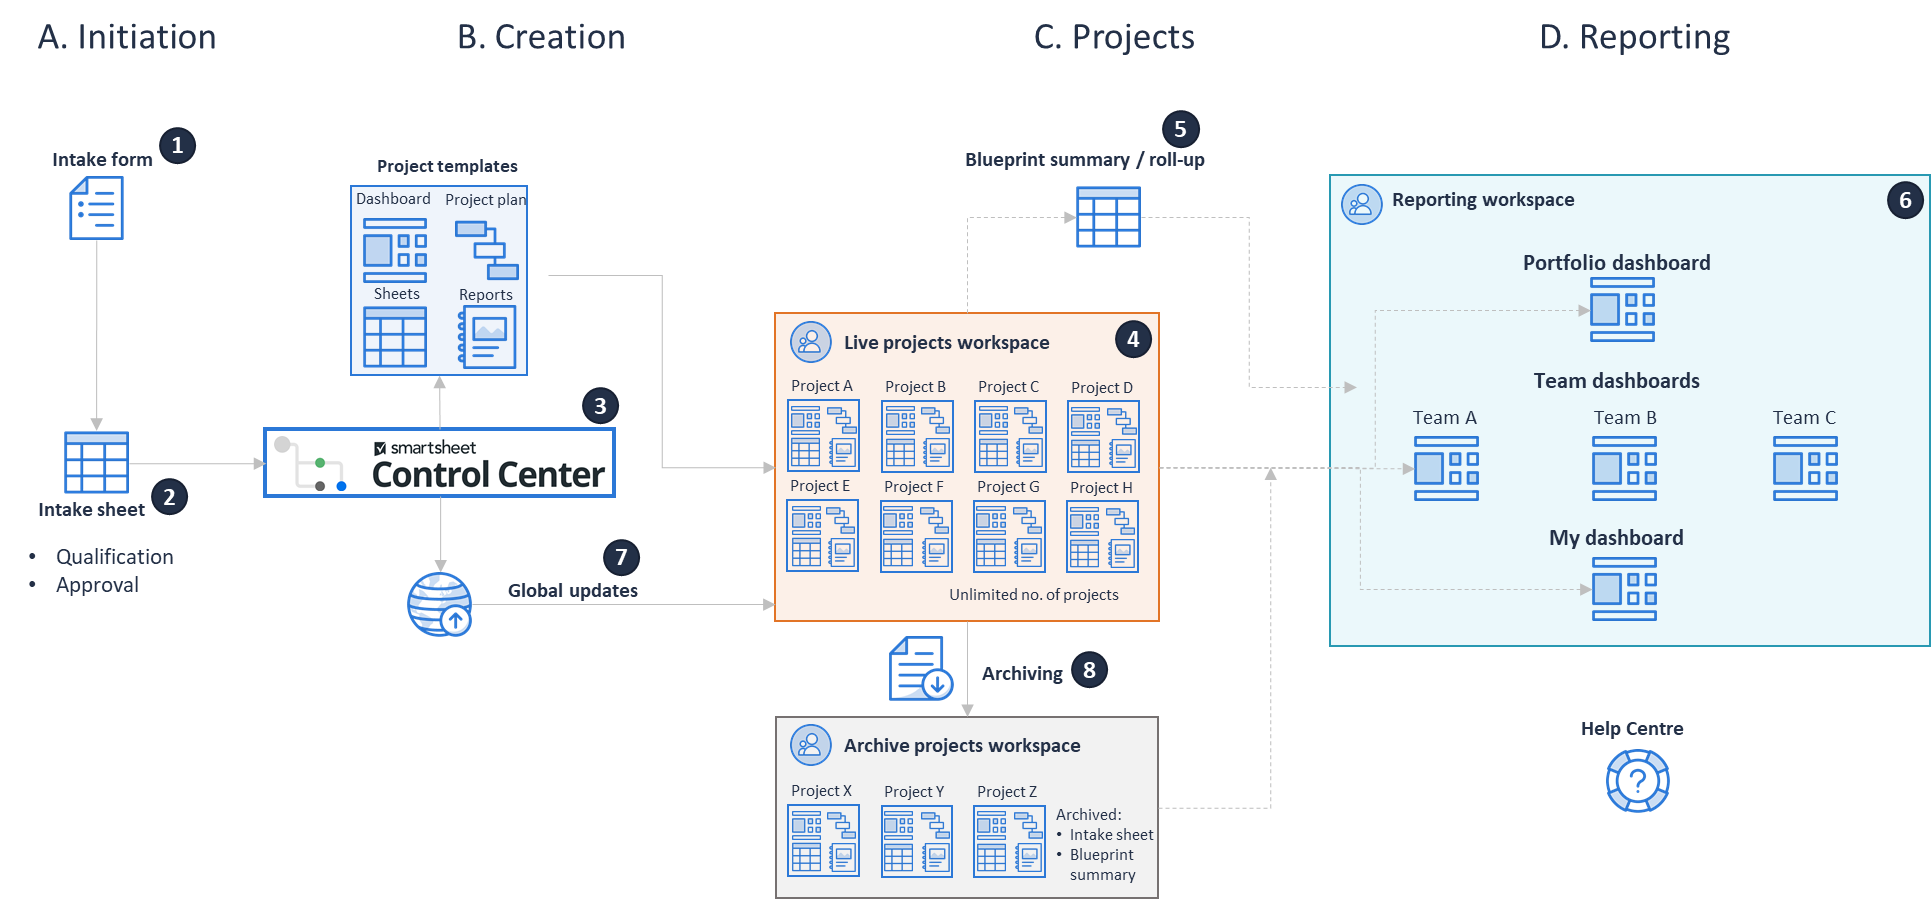
This diagram represents the key elements of an operational SCC. The eight elements highlighted are explained more fully below.

Diagram Elements:
Initiation
Completing of 1) Intake Form is the request for the project to be considered. The form is custom-made so it can contain as much or as little information as required. The information is then collated in the 2) Intake Sheet, awaiting approval. This information and the approval remain in this sheet, so tracking can take place. Once the project is approved to proceed, it moves to the next stage.
Creation
3) SCC contains a set of agreed project documents, for example, Project Plan, RAID Log, P&L. Once a project is approved, it takes five minutes to provision a project, ie, Replicate agreed, consistent documentation for every project. The documents are automatically named for the project, key information is added to the documents then they are located to 4) Project Workspace
Live Projects
Each live project is contained in its own folder in 4) Project Workspace. Pre-determined information is gathered from each project and pushed up into 5) Blueprint Summary. This info is gathered continuously, so the 5) Blueprint Summary contains real-time information from the project documents. Commonly gathered information includes current project timings; overall project health; budget vs actual; the number of overdue tasks or outstanding risks.
Reporting
6) Reporting Suite is a collection of custom-made automated reports and dashboards. Each set is tailored to a specific audience so everyone from the project team to the CEO sees the information relevant to them. The content can be gathered from 2) Intake Sheet, or 4) Project Workspace, or 5) Blueprint Summary. Remember, the latter two sources give real-time information, being delivered via automated reports and dashboards. This represents a considerable timesaving, allowing project managers to get on with delivering projects, rather than just reporting on them.
The final two elements 7) Global Updates and 8) Archiving, are powerful tools for replicating consistent documentation and active information management.
